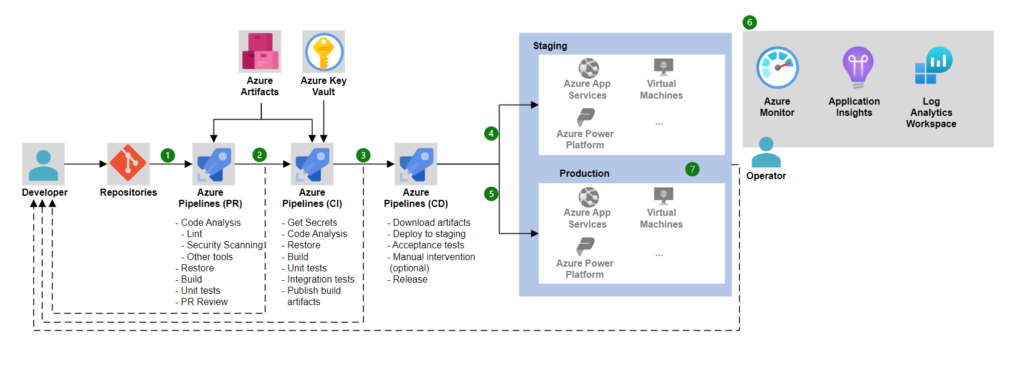
Image Source — Microsoft
What is Azure Pipelines?
Azure Pipelines provides cloud-based solutions. It develops and tests code projects automatically. It supports all major programming languages and project types, and it combines continuous integration, continuous delivery, and continuous testing to develop, test, and distribute your code to any location.
Azure Pipelines is a critical component of Azure DevOps.
Azure Pipelines offers a quick, simple, and secure solution to automate the creation of projects with consistent and high-quality code that is easily accessible to users.
Why Azure Pipelines?
Azure Pipelines can be used to enable the following scenarios:
- It is compatible with any language or platform.
- Deploys to multiple targets at the same time.
- Connects to Azure installations.
- Builds on Windows, Linux, and Mac computers.
- Connects to GitHub
- Contributes to open-source projects.
Types of Azure Pipelines:
- Classic editor
- Using YAML syntax
What do I need to start using Azure Pipelines?
a) Azure Account — Azure DevOps registration is possible with either a Microsoft or GitHub account.
Sign up with a Microsoft account –
— If you don’t have one, create a Microsoft account now.
— Go to Azure DevOps and select Start Free.
— Enter your login information and complete the sign-up procedure.
b) Environment — An environment is a set of resources that can be targeted with pipeline deployments. Dev, Test, QA, Staging, and Production are common environment names. An Azure DevOps environment is a logical destination for your pipeline’s software deployment.
How to create an Environment in Azure DevOps –
Step 1 — Go to the Pipeline Tab from the left navigation and click on it. After this, a new popup window will appear. That will ask you for the environment name.
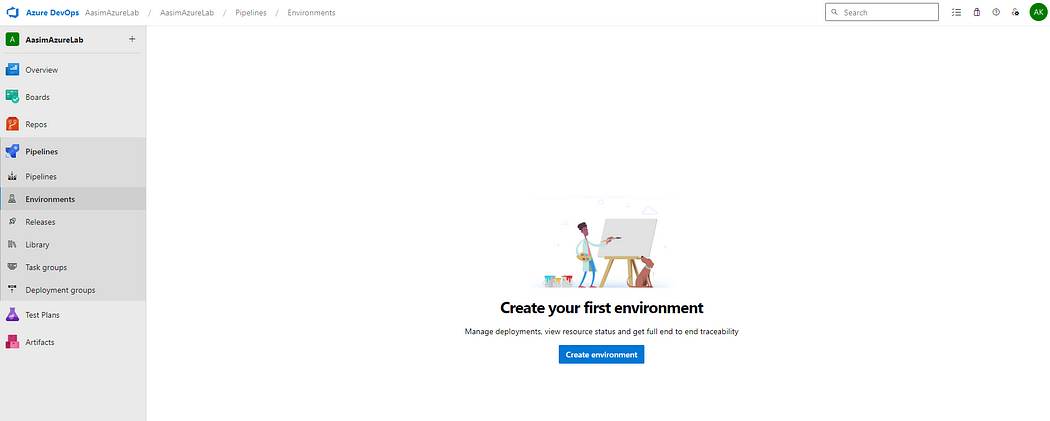
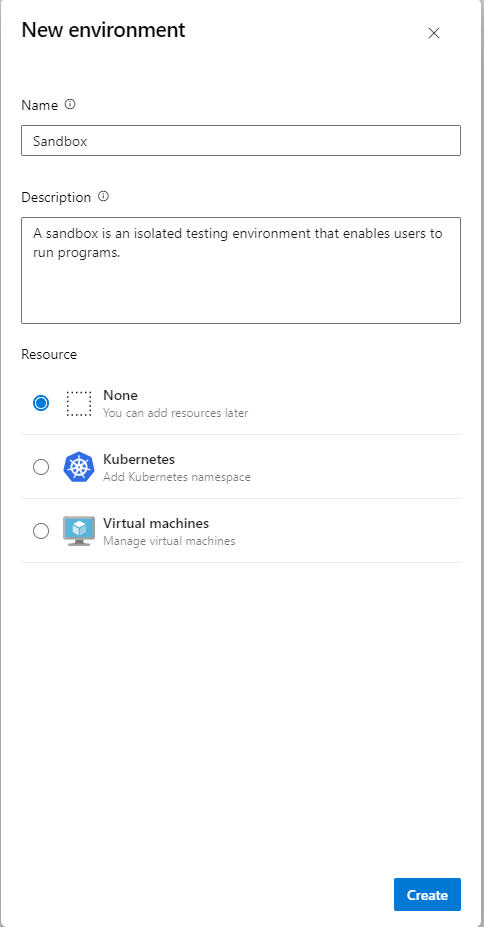
Step 2– Enter the desired environment name, like Dev, QA, Stage, and Prod. Describe the description of the environment in the Description field. And then select the resource you want based on your requirements. Here, I do not want to use Kubernetes or a virtual machine, so I will select the first option, None. Later, if you would like to associate another resource.
Step 3 — Here you go to see the list of environments.

c) Organization — When you join an organization, you have access to Azure DevOps Services, where you can perform the following tasks: Use our cloud service to collaborate with others on application development. Plan and track your work, as well as code for bugs and issues. Install and configure continuous integration and deployment.
How to create a new organization in Azure DevOps –
Step 1 — Click on the Azure DevOps logo and then click on the New Organization link that is placed in the left navigation. Once you click on it, it will ask for further details to provide the organization name, where you want to host, and a security-based captcha.
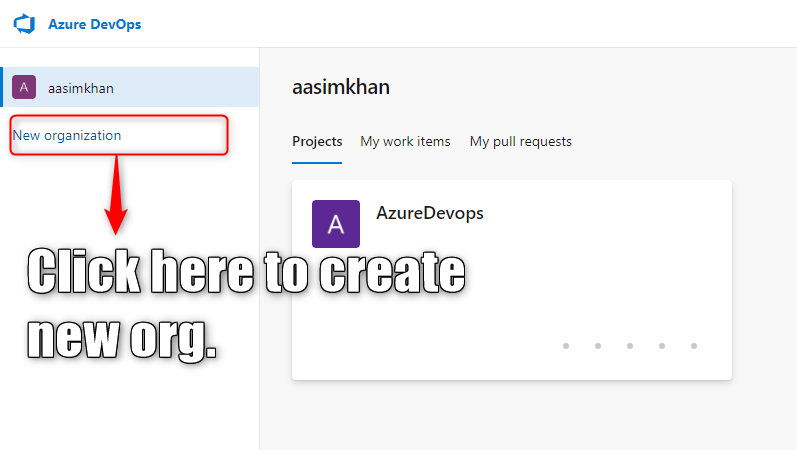
Step 2 — Here you can select the type of project, like public or private. Here I am with a private organization. After clicking on Create Project, it will ask you to accept privacy statements to continue.
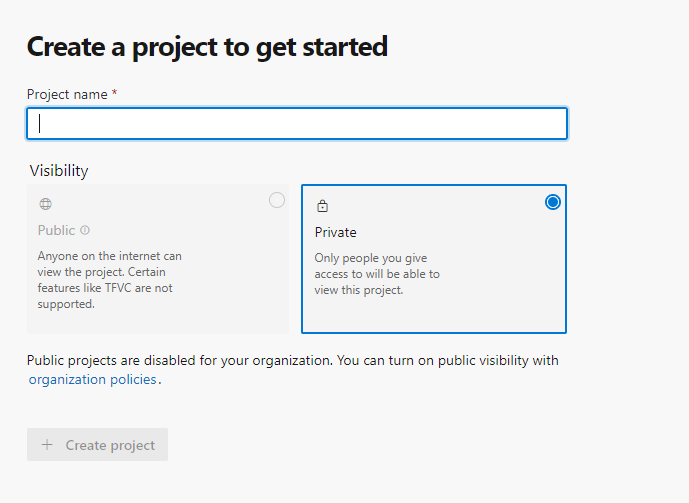
Step 3 — After finishing setup, you can click on the Azure DevOps logo, or You can see all organizations in the left-side navigation. These organizations would be associated with the user based on permission.
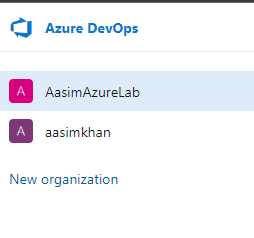
d) Subscription — In Azure, a subscription is a container that stores a set of related business or technical resources. The resources are used and billed collectively. An Azure account can have many subscriptions with different access management policies and invoicing procedures.
Make a subscription to the Microsoft Customer Agreement
Service connection — Azure DevOps Pipelines leverage Service Connections to connect to external services such as Azure, GitHub, Docker, Kubernetes, and many others.
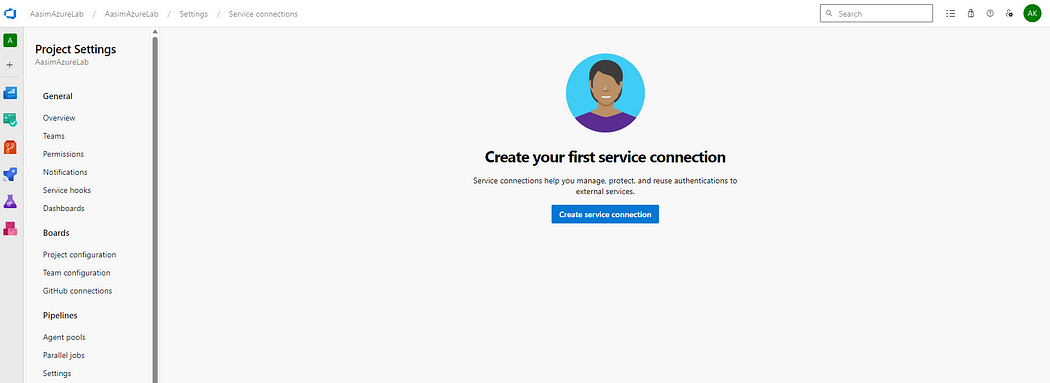
Choose Project Settings from the dashboard.

Choose Service Connection from the dashboard.

If there isn’t any service connection yet, a message will inform you. To start creating a new service connection, click Create Service Connection.
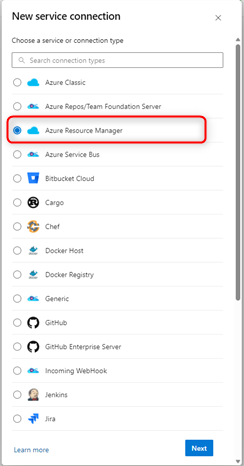
Once you click on it, you need to provide further details that will show as a popup window.
After creating a service connection it will show you the list of service connections under the service connection tab.

e) Version control system — Azure Pipelines requires you to have your source code in a version control system. Git and Azure Repos are the two types of versions control that Azure DevOps supports. Any changes you make to your version control repository are created and evaluated automatically.
How to create a new repo in Azure DevOps –
Step 1 — Select the project where you wish to build the repository after logging in. Skip this step if you are already working on the project.
There is normally a navigation menu on the left side of the project dashboard. To access the repositories area, click “Repos” or “Code”.
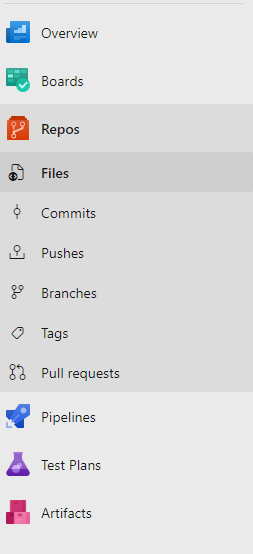
There should be a button to start a new repository once you’re in the Repos area. This is typically denoted by the word “Create” or a plus sign (+). To begin the creation process, click on it.
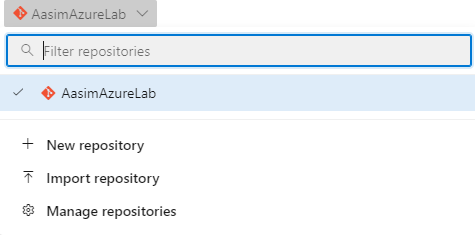
Different repository types, including Git and TFVC (Team Foundation Version Control), are available with Azure DevOps. Choose “Git” because it is a well-liked and often used distributed version control system.
For the repository, you must provide the following configuration information:
– Repository Name: Give your repository a memorable name.
– Provide a description to clarify the repository’s purpose, if you choose.
– Choose between public visibility (everyone can see it) and private visibility (only authorized users can see it).
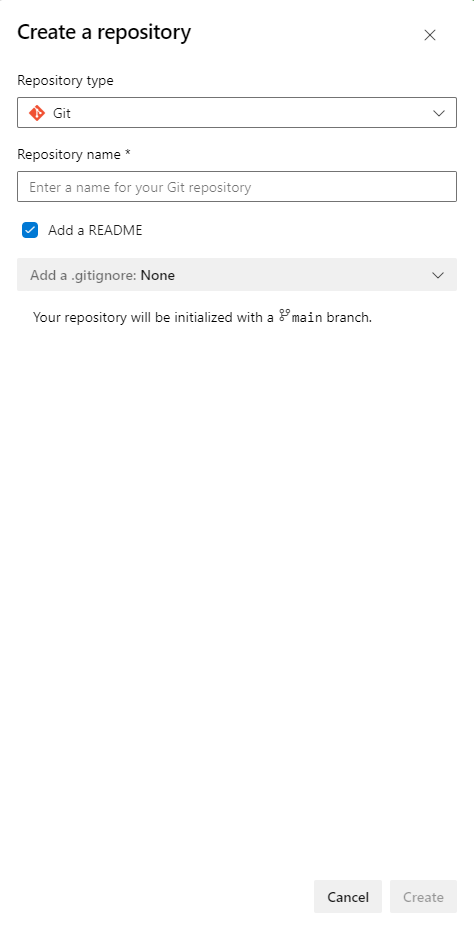
- You have the option to include a README file when starting the repository. This is useful for giving the project’s overview information.
- Another option is a .gitignore template. This makes it easier to keep some files and directories out of version control.
- Choose a license template if your project is open source. This makes it easier to determine how your project will be licensed.
- After you’ve entered all the essential information, click “Create” to start building the repository.
Your repository will be generated in a brief period. The main page of the repository, where you can manage your code, branches, pull requests, and more, will be displayed. You must clone the repository in order to begin using it on your home computer. Copy the repository URL after clicking the “Clone” button. And you can see your repo in the repos list.
git clone <repo path>
If you have already set up or configured the required elements, then you can skip that, and once you have finished all these steps, we will write our pipeline code using YAML syntax into our source code.
# Starter pipeline
# Start with a minimal pipeline that you can customize to build and deploy your code.
# Add steps that build, run tests, deploy, and more:
# https://aka.ms/yaml

trigger:
  - main #branch name

pool:
  vmImage: "windows-2022" #image where you want to deploy.

stages:
- stage: Build
  jobs:
  - job: Build
    displayName: "Install npm packages and Build"
    workspace:
      clean: all
    steps:
      - checkout: self
        submodules: true
      - task: NodeTool@0
        inputs:
          versionSpec: '14.x'
          checkLatest: true
        displayName: 'Install Node.js'

      - script: |
          npm install
        displayName: 'Install dependencies'

      - script: |
          npm run build
        displayName: 'Build'

      - task: CopyFiles@2
        inputs:
          SourceFolder: '$(System.DefaultWorkingDirectory)/build'
          Contents: '**'
          TargetFolder: '$(Build.ArtifactStagingDirectory)'
          OverWrite: true
        displayName: 'Copy build files to artifacts'

      - task: PublishBuildArtifacts@1
        inputs:
          PathtoPublish: '$(Build.ArtifactStagingDirectory)'
          ArtifactName: 'drop'
          publishLocation: 'Container'
        displayName: 'Publish Artifact'

- stage: Deploy
  jobs:
    - job: Deploy
      displayName: Deploying
      steps:
      - task: DownloadPipelineArtifact@2
        inputs:
          source: 'current'
          artifact: 'drop'
          path: '$(Pipeline.Workspace)'

      - task: AzureRmWebAppDeployment@4
        inputs:
          ConnectionType: 'AzureRM' #Connection type
          azureSubscription: '<your_azure_subscription>'
          appType: 'webApp'  #Required when ConnectionType = AzureRM. App Service type
          WebAppName: '<your_web_app_name>' #<App Service Name.>
          packageForLinux: '$(Pipeline.Workspace)'
git add <files>
git commit -m "your message here"
git push
After pushing your code, you need to create the first pipeline in the pipeline section that will come from the left-side navigation of the Azure dashboard.
How to create or configure Azure Pipeline: –
Step 1 — Choose Pipelines from the dashboard, then click Builds. There won’t be any build pipelines yet, a message will inform you. To start building the pipeline, click Create Pipeline.
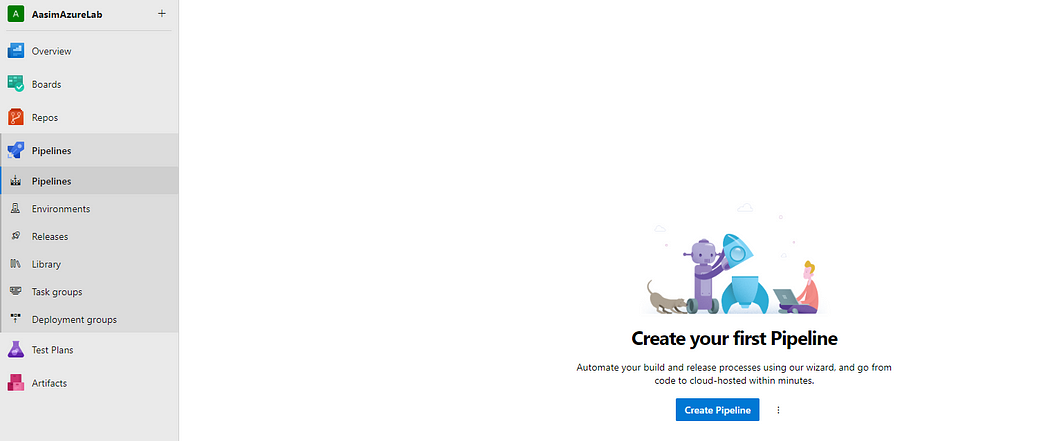
Step 2 — You will then be asked to specify the location of your code. The code for this project is kept in a GitHub repository. Decide on GitHub. The triggers for calling the build will originate from this location, where the code is also kept.
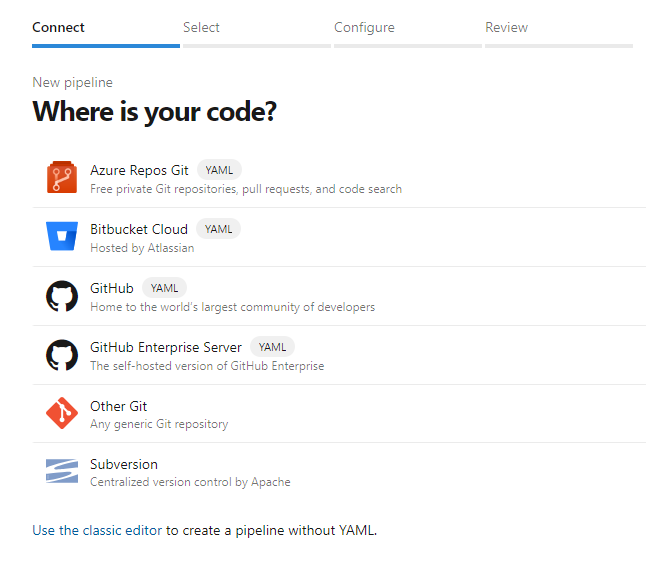
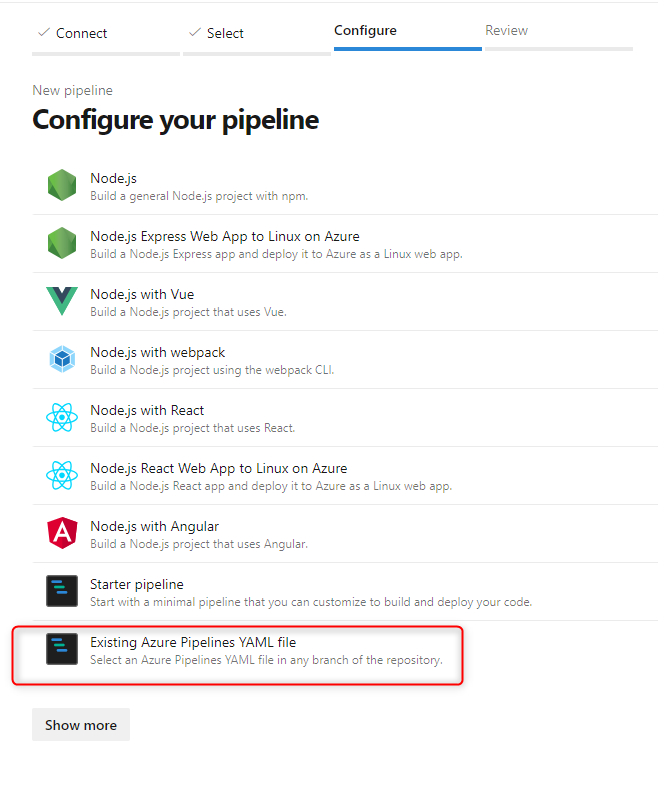
Step 3 — After selecting repos, you will get a new screen to choose the pipeline template. Here we are going to select the Existing Azure Pipeline YAML file option. If you want to write from scratch, then you can select Starter Pipeline.
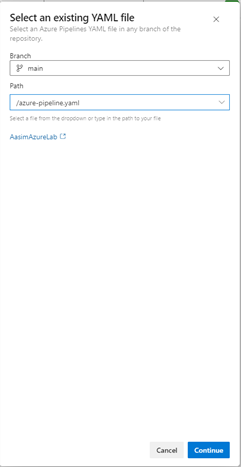
Step 4 — If you would select Existing Azure Pipeline YAML file then it will ask for new values from another popup window. You need to provide the name and the path YAML file. And click on continue.
Step 5 — In the final step you will review your pipeline and what you are going to run, and here are a few other options such as variables. If you want to make it an input parameter, you can add or set variables. And last, you can either save or run your pipeline.
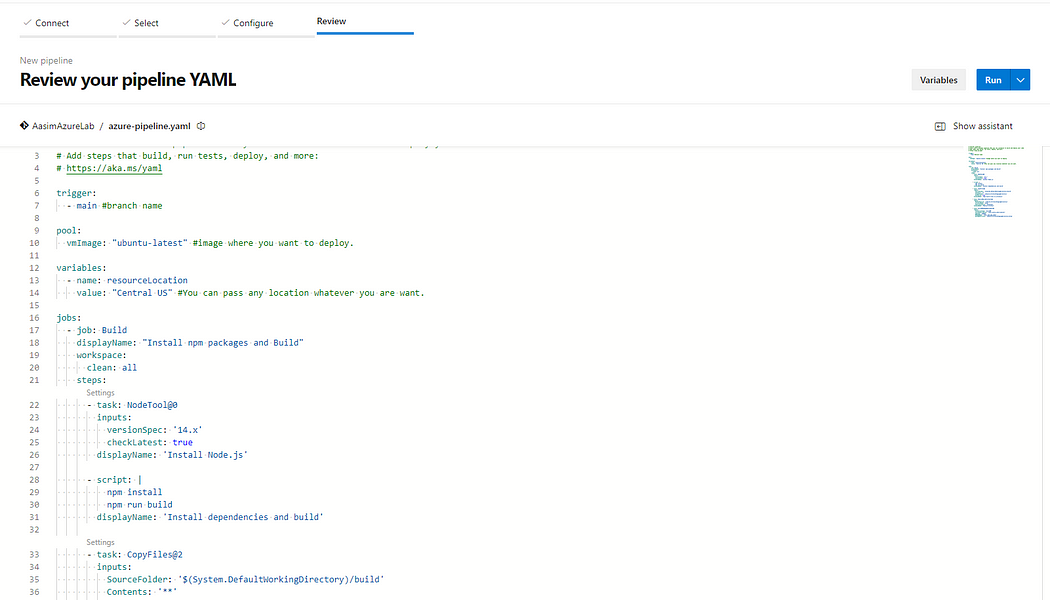
When you run your pipeline for the first time, a permission request to authorize your service connection will be made. Once you permit it to execute, your first pipeline will begin to function.

Your pipeline will appear in the pipeline tab once it has successfully run.

Examining resources from deployed Azure WebApps.
Check out the results of your labor now that the procedure is finished.
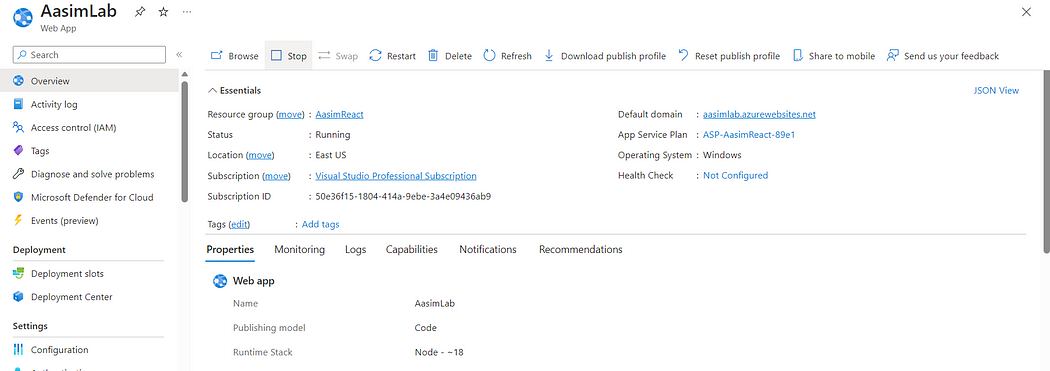
Enter the Azure Portal, find the Azure App Service you chose as the target in the release process, and copy the URL as displayed below.
Enjoyed reading this article? Please share the knowledge with your friends and colleagues.